How to Create a Macro in Excel - VBA Tutorial
- Drew Koontz
- Jan 4, 2023
- 3 min read

Knowing how to create macros will let you automate repetitive tasks and create your own customized features and functions in Excel. There are just a few steps you need to know to start creating your very own.
Contents:
How to Create a Macro From Scratch in VBA
Macros in Excel are all written in a programming language called VBA (Visual Basic for Applications). Before we jump into how to write (or record) your own code, let's go over a few steps needed to get you ready to create your own macros.
For now, don't worry about the actual code, in this tutorial you'll learn the basics of getting the VBA editor set up and how to run your macros.
1. Open the Excel Workbook Where You Want to Create the Macro
The first step to creating a macro is to open up a new blank workbook that will contain the macro, or open an existing file that you wish to add a macro to.

Note: In order for macros to work properly, the standard .xlsx file type will not work. Macros can only be run in .xlsm files. File types like .xlsb and a few others will also work but .xlsm is the most common.
2. Navigate to the "Developer" Ribbon Tab

If the Developer tab is not visible, you can enable it by going to the "File" menu, clicking "Options," and then selecting the "Customize Ribbon" option in the left-hand menu. In the right-hand panel, check the box next to "Developer" to enable the tab.

This tab houses more of the advanced Excel options and everything you'll need to start creating macros. Once you've activated this tab once, it will stay active across all of your Excel files.
3. Open the VBA Macro Editor
Click on the "Visual Basic" button in the "Code" group on the Developer tab.

This will open the Visual Basic editor, where you can write and edit your VBA code.
The shortcut of alt + F11, will also open the editor and will save you some clicks.

4. Create a New Module
Each macro needs to be put inside of its own module. A module can be thought of as a separate file in your workbook dedicated to VBA code and macros.
In the Visual Basic editor, create a new module by going to the "Insert" menu in the top bar, and clicking on the "Module" option.

You can also right click anywhere on the project files on the left hand window and insert a module that way.

This will open a new blank window where you can write your VBA code.
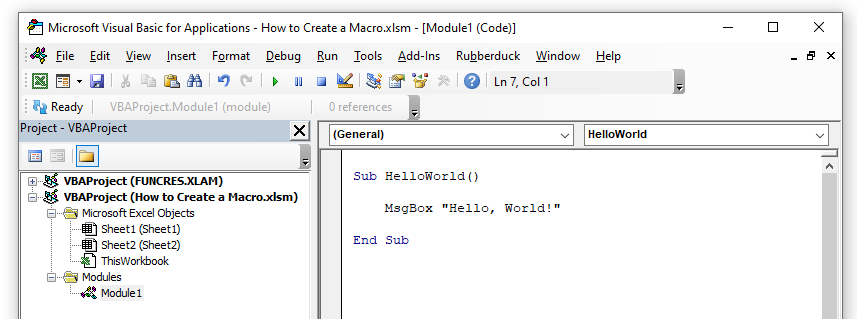
5. Enter the VBA Code for Your Macro

In this blank area to the right of the project window is where you'll be writing all of your VBA code. You can think of this as a notepad for your code. Any code written in here will be executed when the macro is run.
In this example, we're just going to write a simple macro that creates a message box saying "Hello, World!". We'll get into specifics of how to write macros in a separate tutorial, but for now, just entering this code will give you something to run.
Sub HelloWorld()

    MsgBox "Hello, World!"

End Sub
6.Close the VBA Editor and Save the Workbook
With the macro written, you are free to close out of the editor and save the workbook. Any changes you've made to the macro won't be saved until the entire workbook is saved.
7. Run the Macro
To run the macro, go back to the Excel workbook, and back into Developer tab. Click on the "Macros" button in the "Code" group on the Developer tab.


This will open the "Macros" dialog box, where you can select the macro that you want to run and click on the "Run" button.

And there you go! You've successfully created and ran a macro from scratch.
